How to password protect files and directories

In this guide you can find how to set up password protection both for directories and a single file.
How to password protect directories
How to password protect files
- WordPress and password protected files
- How to password protect multiple files
How to password protect directories
- For cPanel Basic Theme
- For cPanel Retro Theme
For cPanel Basic Theme:
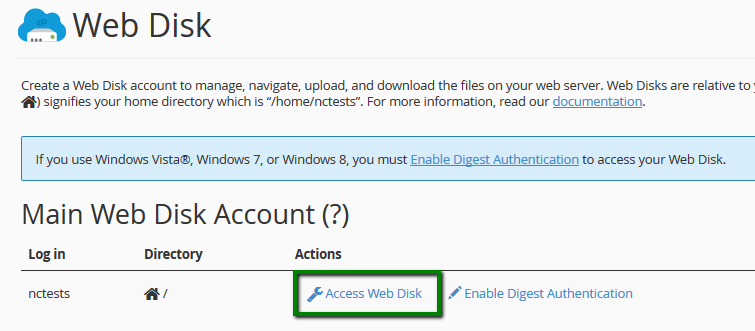
1. Log in to your cPanel account >> Files section >> Directory Privacy menu:

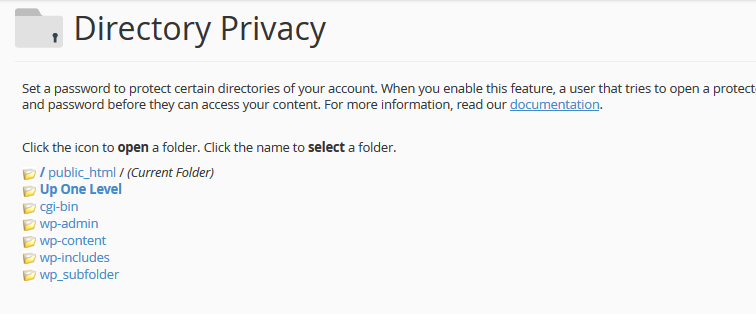
2. Once there, you may pick up the directory you wish to protect:
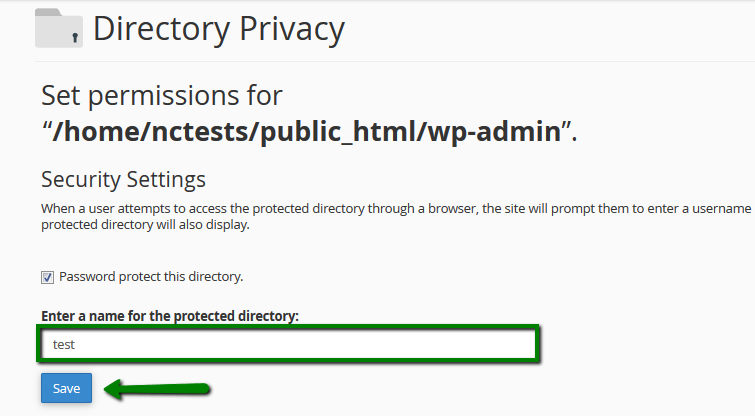
3. In Security Settings section give a name to the protected directory and check-mark Password protect this directory option:

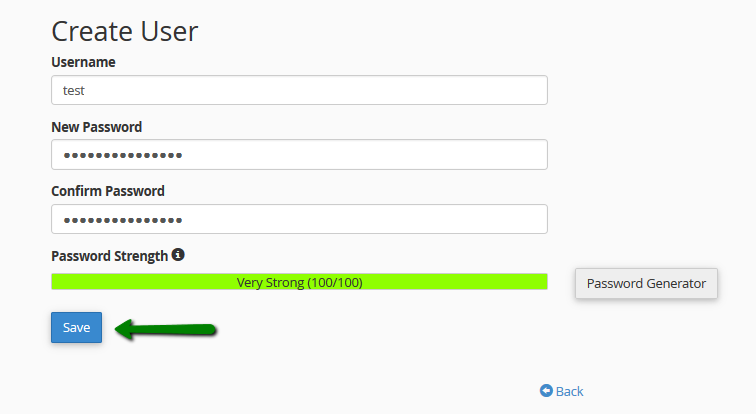
4. In Create User section specify the username and the password that should be used to access this directory:

5. In our example we've set protection for wp-admin directory, so that when following http://nctest.info/wp-admin link, the following authentication pop-up window comes up:
Mozilla Firefox

Google Chrome
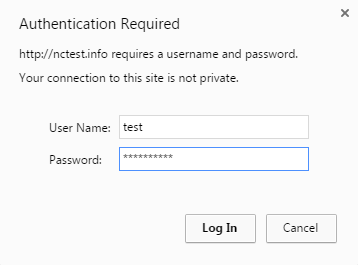
This error message will appear if one fails to enter the required credentials:

For cPanel Retro Theme:
1. Log in to your cPanel account > Files section > Directory Privacy menu:
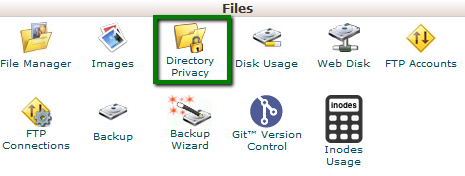
2. Once there, you may pick up the directory you wish to protect:

3. In Security Settings section give a name to the protected directory and check-mark Password protect this directory option:
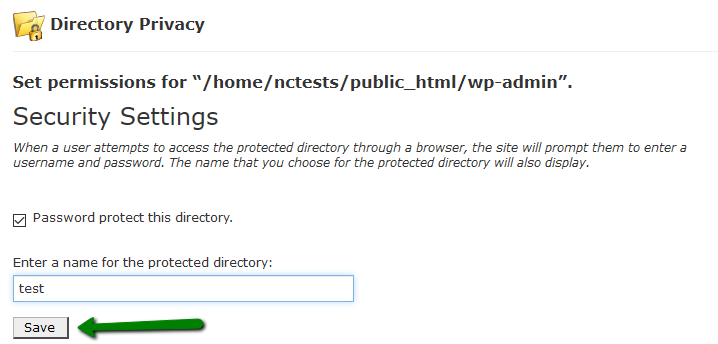

4. In Create User section specify the username and the password that should be used to access this directory:


5. In our example we've set protection for wp-admin directory, so that when following http://nctest.info/wp-admin link, the following authentication pop-up window comes up:
Mozilla Firefox

Google Chrome

This error message will appear if one fails to enter the required credentials:

How to password protect files
Follow the steps below in order to password protect an individual file:
1. Navigate to /home/user in your File Manager:

Make sure that Show Hidden Files (dotfiles) option is enabled in Settings menu:

2. Create a file named .htpasswd and place it above your root directory, so visitors cannot access it.
Example of the root directory pathway for shared accounts: /home/cpanelusername/.htpasswd
NOTE: replace cpanelusername with the actual cPanel username for your hosting account:


3. Create an encrypted password using htpasswd generator. It doesn't matter how many individual files you wish to protect, they can all share a common .htpasswd file:


4. Right click on .htpasswd file and select the Edit option:

5. Place the generated .htpasswd code into .htpasswd file and click on Save Changes button:

6. Navigate to the directory where the file that you would like to password protect is stored.
7. If there is still no .htaccess file, create one by clicking on +File icon:

8. Right click on .htaccess file and select the Edit option:

9. Insert the following code into .htaccess file:
AuthName "Member Only"
AuthType Basic
AuthUserFile /home/cpanelusername/.htpasswd
require valid-user
NOTE: replace examplefile.extension with your actual file's name and cpanelusername with your actual cPanel username.

10. Click on Save and then on Close button.
This will help you to protect the specified file, while leaving all other files in the folder unprotected.
WordPress and password protected files
WordPress can have some minor conflicts with password protecting files due to the changes in its default .htaccess rules.
If you have WordPress installation with enabled permalinks, it is not possible to use Password Protect Directories option in cPanel or via a .htpasswd file.
Following these steps you will be able to password protect files by editing .htaccess file.
Review this article for further information regarding how to edit your .htaccess file.
NOTE: make sure that you have created a backup of your .htaccess file before making any changes to it. Thus, you will be able to revert back to a previous version if needed.
1. Edit .htaccess File
Edit .htaccess file in the folder for your WordPress installation and remove the line of code shown in bold below:
#BEGIN WordPress
RewriteEngine On
RewriteBase /
RewriteCond %{REQUEST_FILENAME} !-f
RewriteCond %{REQUEST_FILENAME} !-d
RewriteRule . /index.php [L]
#END WordPress
Replace this line:
RewriteRule . /index.php [L]
with this new one:
RewriteRule ./ /index.php [L]
After that add the code needed for password protection. The final version should look like this:
#BEGIN WordPress
RewriteEngine On
RewriteBase /
RewriteCond %{REQUEST_FILENAME} !-f
RewriteCond %{REQUEST_FILENAME} !-d
RewriteRule ./index.php [L]
# END WordPress
AuthName "Member Only"
AuthType Basic
AuthUserFile /home/cpanelusername/.htpasswd
require valid-user
And save the changes.
Below you can see the example of our .htaccess file code:

2. Reset Permalinks
You will also need to re-generate WordPress permalinks to make sure that they have the new URL structure. You can do it in your WordPress admin panel >> Settings >> Permalinks menu.
If you had Post name option enabled, for instance, you need to switch it to Default, save the changes and then revert everything back:

This should reset the permalinks and prevent any posts or pages from returning a 404 Page Not Found error.
As a result, you will get the follow authentication pop-up window when trying to open a protected file in browser:
Mozilla Firefox

Google Chrome

This error message will appear if one fails to enter the required credentials:

How to password protect multiple files
You can protect more than one file by using wildcard names. On the FilesMatch line in the previous .htaccess code, try one of the directives below:

That's it!
"Our guide will help you understand the underlying principles of WordPress optimization"
Rasalina Willamson
Ut enim ad minima veniam, quis nostrum exercitationem ullam corporis suscipit laboriosam, nisi ut aliquid ex ea commodi consequatur Quis autem vel eum iure reprehenderit qui in ea voluptate velit esse quam nihil molestiae
Share this Post
Trusted By
900+
Client World wide
24x7x365
Professional Technical Support
Providing Cloud
Services
Since 2008
Network Uptime
99.9%
Server Uptime


