How to set up rules and redirects in .htaccess
htaccess is a directory-level configuration file supported by the Apache web server. It is used to alter web server configuration (enable or disable additional features) for the specific account without changing global server settings.
The .htaccess file takes effect over the entire directory it is placed in, including all files and subdirectories. The changes made in this file will be implemented immediately and no server restart is required.
How to locate .htaccess file
List of commonly used .htaccess rules:
- Authorization/authentication
- Blocking
- Custom Error Pages
- Mod_Rewrite (redirect rules)
- Domain root directory change
Disabling existing .htaccess rules
To access the main .htaccess file of your hosting account, follow the steps below:
1. Log into your cPanel.
2. Navigate to the section Files >> File Manager:

3. If you wish to edit .htaccess file for your main domain, navigate to public_html folder. If you need to make some changes to the addon domain, move to public_html/youraddondomain.com folder.
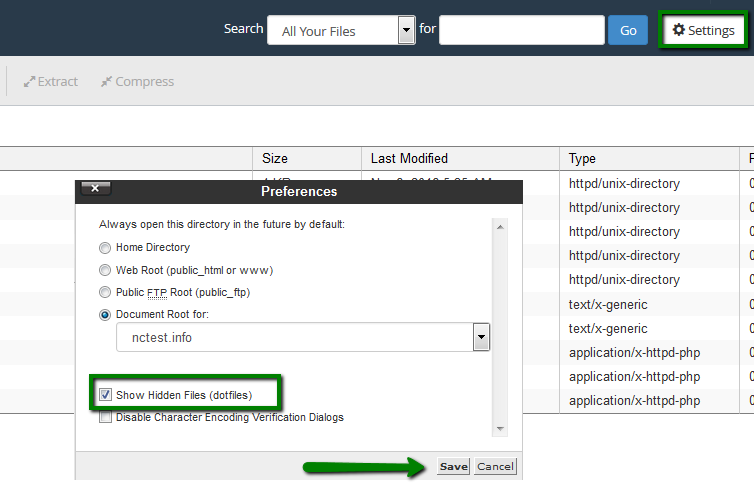
Once there, make sure that Show Hidden files (dotfiles) option is enabled in Settings menu:
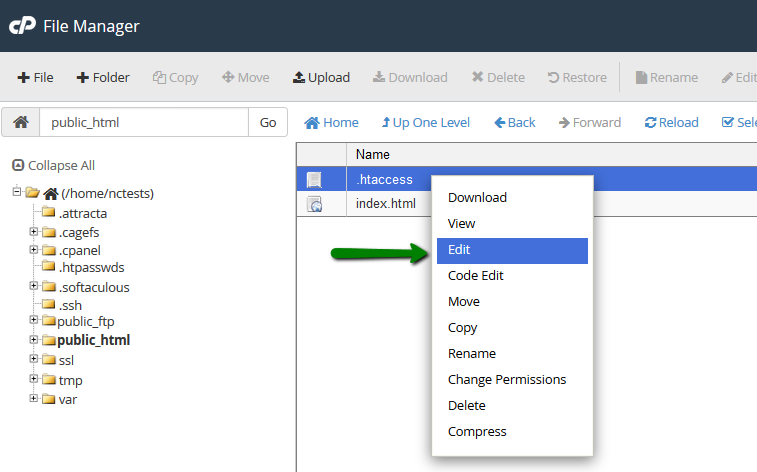
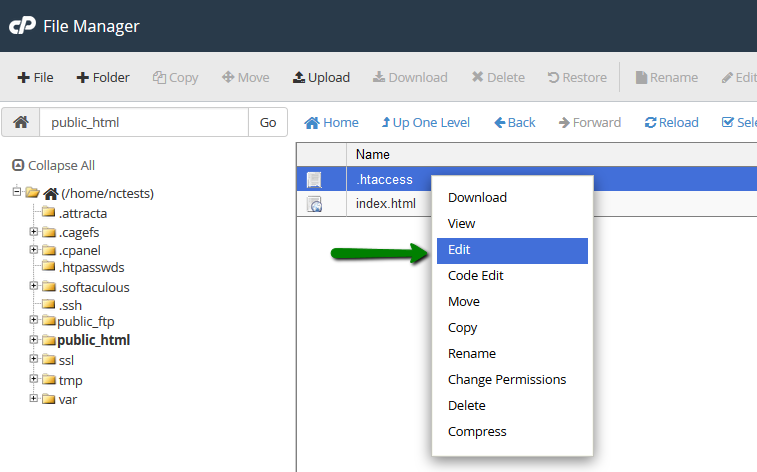
4. Locate .htaccess file, right-click >> Edit:
5. If there is no .htaccess file located in your File manager, feel free to create a new one using File option:
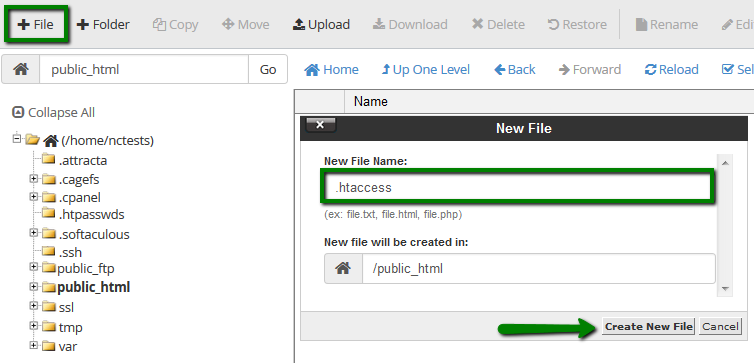
You are ready to add your own configuration rules and save them.
The common usage rules of an .htaccess file are listed below:
Authorization/authentication – specifies security restrictions for a directory/subdirectory.
You can password-protect a directory, or several of them, and any time a visitor tries to access it, username and password will be required.
To set up such protection, you need to:
1. Create the directory you want to protect in /home/cpanel_user/.htpasswds/ folder (e.g., for public_html/test the path will be .htpasswds/public_html/test/).
2. Create a passwd file in this directory and add hashed access details using this online generator.
3. Add the following directives to .htaccess:
AuthType Basic
AuthName "Directory Name"
AuthUserFile "/home/cpanel_user/.htpasswds/public_html/test/passwd"
require valid-user
Blocking – blocks users by IP address or domain. It is very useful to block unwanted visitors or to allow accessing certain sections of the website by its owner, administration area, for example.
To set up certain blocking rules, create an .htaccess file with the following text:
to allow access to everybody else and block users with an X.X.X.X IP address
Require all granted
Require not ip X.X.X.X
to block all the visitors except for the specific X.X.X.X and Y.Y.Y.Y IPs
Require all denied
Require ip X.X.X.X
Require ip Y.Y.Y.Y
NOTE: Do not mix the deprecated Allow, Deny, and Order directives with the new Require directive.
Custom Error Pages – allows creating custom error pages for a site. This option is very useful as it allows you to show website visitors an error message matching your website theme if a URL on your website does not work. This helps to avoid the default '404 File Not Found' error for example and allows you to display a customly designed error with the guiding directions back into your website content, rather than leaving puzzled.
To set up a custom error document, create an .htaccess file with the following text below:
ErrorDocument 404 /404.html
Whenever a 404 (File Not Found) error appears, this line tells the Apache Web server to load an 404.html file located in the directory root of the domain you set the error page for.
NOTE: To set up a document for other errors (403, 500, etc.), just replace 404 with the corresponding error code and /404.html with the path to the error file.
Mod_Rewrite – specifies how web pages and URLs are displayed to the visitors.
We would like to draw your attention to the usage of Mod_Rewrite rules in .htaccess file.
By default, Mod_Rewrite maps a URL to a filesystem path. However, it can also be used to redirect one URL to another URL.
Before creating a redirect, you should choose the redirection type which would be more preferable for you:
- Permanent redirect has a status code of 301, and unlike the temporary one, it is cached in the browser memory. It implies that the page has been moved and requests all search engines and user agent coming to the page to update the URL in their database. This is the most common type of redirect.
- Temporary redirect means that the page is sending status code 302 to the browser. Code 302 tells the browser not to cache this redirect into its saved data. It will redirect the visitor or search engine, but the search engine will continue to index to the original page. This is the recommended type of redirect, unless you are absolutely sure that you will never change it in the future.
The list of the most common and useful redirects, which can be set through the .htaccess file, can be found below (the domains specified in the examples should be replaced with your own ones):
Permanent redirect from example.com to domain.com
RewriteEngine On
RewriteCond %{HTTP_HOST} ^example\.com$ [OR]
RewriteCond %{HTTP_HOST} ^www\.example\.com$
RewriteRule ^(.*)$ "http\:\/\/domain\.com/$1" [R=301,L]
Temporary redirect from example.com to domain.com
RewriteEngine On
RewriteCond %{HTTP_HOST} ^example\.com$ [OR]
RewriteCond %{HTTP_HOST} ^www\.example\.com$
RewriteRule ^(.*)$ "http\:\/\/domain\.com\/" [R=302,L]
NOTE: Below are the examples of permanent redirects. Temporary one can be defined by replacing [R=301,L] with [R=302,L] in the end of the code (where necessary).
Redirect from example.com/subfolder to domain.com
RewriteEngine On
RewriteCond %{HTTP_HOST} ^example\.com$ [OR]
RewriteCond %{HTTP_HOST} ^www\.example\.com$
RewriteRule ^subfolder/$ "http\:\/\/domain\.com\/" [R=301,L]
Redirect from HTTP to HTTPS for example.com
RewriteEngine On
RewriteCond %{HTTPS} !=on
RewriteRule .* https://example.com%{REQUEST_URI} [R,L]
or
RewriteCond %{SERVER_PORT} 80
RewriteCond %{HTTP_HOST} ^example\.com$ [OR]
RewriteCond %{HTTP_HOST} ^www\.example\.com$
RewriteRule ^(.*)$ https://www.example.com/$1 [R,L]
Redirect from non-WWW to WWW
for any domain .htaccess takes effect on:
RewriteEngine On
RewriteCond %{HTTP_HOST} !^www\.
RewriteRule ^(.*)$ http://www.%{HTTP_HOST}/$1 [R=301,L]
for a certain domain, example.com:
RewriteEngine On
RewriteCond %{HTTP_HOST} ^example\.com$ [NC]
RewriteRule ^(.*)$ http://www.example.com/$1 [R=301,L]
Redirect from WWW to non-WWW
for any domain .htaccess takes effect on:
RewriteEngine On
RewriteCond %{HTTP_HOST} ^www\.(.*)$ [NC]
RewriteRule ^(.*)$ http://%1/$1 [R=301,L]
for a certain domain, example.com:
RewriteEngine On
RewriteCond %{HTTP_HOST} ^www\.example\.com [NC]
RewriteRule (.*) http://example.com/$1 [R=301,L]
Redirect all example.com pages to the corresponding domain.com pages
RedirectMatch 301 ^/(.*)$ http://domain.com/$1
NOTE: All the pages’ names have to match on both domains or the redirect will lead to a "Page not Found" message on the target website.
Redirect one page to a new URL
Redirect 301 /old_page.html http://www.domain.com/new_page.html
NOTE: This might be useful when you want to redirect a deleted page to a 404 error or for SEO purposes after the content references updates.
Changes the directory root for the main domain to public_html/subfolder
RewriteEngine on
RewriteCond %{HTTP_HOST} ^(www.)?example.com$
RewriteCond %{REQUEST_URI} !^/subfolder/
RewriteCond %{REQUEST_FILENAME} !-f
RewriteCond %{REQUEST_FILENAME} !-d
RewriteRule ^(.*)$ /subfolder/$1
RewriteCond %{HTTP_HOST} ^(www.)?example.com$
RewriteRule ^(/)?$ subfolder/index.php [L]
NOTE: The .htaccess file should be located in the directory root of the domain you wish to configure certain rules for.
Disabling existing .htaccess rules
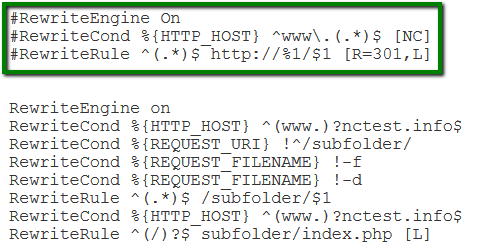
If you need to disable some of the existing rules, for example, for testing purposes, you can simply comment them out. In order to do so, add the pound sign # at the beginning of each line of the rule.
Also, it is possible to disable the line or even the block of lines by selecting ones and using the Ctrl + / shortcut.
That's it!
"Our guide will help you understand the underlying principles of WordPress optimization"
Rasalina Willamson
Ut enim ad minima veniam, quis nostrum exercitationem ullam corporis suscipit laboriosam, nisi ut aliquid ex ea commodi consequatur Quis autem vel eum iure reprehenderit qui in ea voluptate velit esse quam nihil molestiae
Share this Post
Trusted By
900+
Client World wide
24x7x365
Professional Technical Support
Providing Cloud
Services
Since 2008
Network Uptime
99.9%
Server Uptime


